The Flying Black Thing.
AKA
The Black Flying Thing.
April 2007 – The Son of Black Rainbow.
I wasn't planning on building another flying machine so soon. I was thinking about making a tube I could cut several propeller shrouds from but I got carried away. Sometimes I just can't help myself. Sometimes an idea grabs you and demands to be given flesh.
 Black
rainbow started with a shopping trip to buy wax. I still had
enough wax (just). This project started with a shopping trip to
buy a 26 cm cooking pot. Inside this pot was placed a cut-off
plastic bucket full of water and the remaining gap was filled with
molten wax. This formed a tube for moulding the propeller
shroud.
Black
rainbow started with a shopping trip to buy wax. I still had
enough wax (just). This project started with a shopping trip to
buy a 26 cm cooking pot. Inside this pot was placed a cut-off
plastic bucket full of water and the remaining gap was filled with
molten wax. This formed a tube for moulding the propeller
shroud.
The battery tube plug was cast in a component box and
shaped mainly using a clothes iron (which I only use for wax).
Originally I had in mind a smaller tube just big enough for a
battery. Not knowing what batteries I might need in future I made
it bigger. When I measured the plug I found it was almost wide
enough for my camera so two pieces of waxed spruce were pinned to
the sides to enlarge it.
This model was intended just to be tough – camera carrying is a bonus.
 Vacuum
resin infusion is my standard way to make composites these
days. To make things interesting I infused the shroud and battery
tube in one operation so the bounding between the two is as good
as possible. The carbon was laid up dry and held in place with
sewing cotton and dressmakers pins. The resin diffusion medium is
cheap thin shade cloth. The resin was infused through the port in
the lower left of the photo and vacuum applied to the inner part
of the wax tube (port visible upper right). The infusion port was
pointing up during infusion.
Vacuum
resin infusion is my standard way to make composites these
days. To make things interesting I infused the shroud and battery
tube in one operation so the bounding between the two is as good
as possible. The carbon was laid up dry and held in place with
sewing cotton and dressmakers pins. The resin diffusion medium is
cheap thin shade cloth. The resin was infused through the port in
the lower left of the photo and vacuum applied to the inner part
of the wax tube (port visible upper right). The infusion port was
pointing up during infusion.
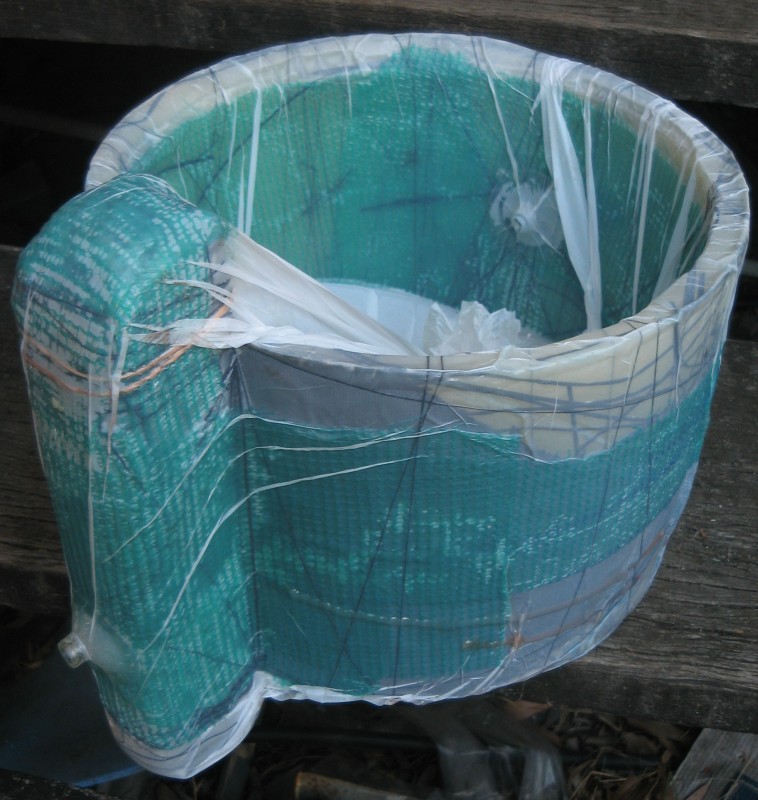
Things did not go smoothly. The
plastic bag was too small and didn't conform properly and formed
resin paths where I didn't want them. I had to intervene and
create ad-hoc infusion ports to save it.

 There
were also some wrinkles where the carbon was too loose. With care
I might have been able to massage them out but I was under time
pressure and missed it. I ground these off later and patched them.
These photos are after the initial trim. The holes along the
inside are where wooden pins held the two wax plugs in alignment
during infusion and curing.
There
were also some wrinkles where the carbon was too loose. With care
I might have been able to massage them out but I was under time
pressure and missed it. I ground these off later and patched them.
These photos are after the initial trim. The holes along the
inside are where wooden pins held the two wax plugs in alignment
during infusion and curing.
The reddish thing is my camera.
This has been left showing for the photo – normally it
slides completely inside.
 Here
it is ready for it's test flight. It has been trimmed some more. I
expect it will be trimmed more after I get the bugs out. The
battery tube has holes added for lightness, ventilation and
access. The large hole it for the camera to see out when mounted
for side view.
Here
it is ready for it's test flight. It has been trimmed some more. I
expect it will be trimmed more after I get the bugs out. The
battery tube has holes added for lightness, ventilation and
access. The large hole it for the camera to see out when mounted
for side view.
This time I used a larger box-like motor tube.
This means I have flat surfaces to attach the fins and I can twist
the tube off axis to try to compensate for the motor torque. Here
it is tacked in place with CA so I can break the join and
reposition it till I'm happy with the angle. Unlike the rainbow,
the tube shape also let me run wires around the motor inside the
tube so I didn't need to route them through the main fin. The
motor tube and main fin were both infused carbon moulded around a
wax former. The motor is the dual stator CDROM motor I stole from
the rainbow. It is kit built 18 turn delta wound. The blue thing
inside the fin is an 18 amp ewatts brushless ESC – quite
cheap at $24aus. It is heavier than the phoenix I used previously
but a fraction the cost. Power comes from a 1800mah 11.1V LiPo.
Deans connectors are used for the battery connection. Foam holds
the battery in place and provides crash protection.
 The
steering is above deck this time. The rainbow's steering works
fine but gets in the way when trying to position things to adjust
COG. This one uses a bluebird metal geared mini servo with a
cyberchute
servo arm. The cyberchute servo arm
extenders are too short so I made my own. They are made from some
clips I found in the tackle section of a cheap shop (crazy
clarke), some antenna tubes and golden cable. Golden cable is
brass plated steel wire. The cable is passed through the tube –
the ends looped back and soldered. Two layers of heat-shrink
stiffen the clip attachment.
The
steering is above deck this time. The rainbow's steering works
fine but gets in the way when trying to position things to adjust
COG. This one uses a bluebird metal geared mini servo with a
cyberchute
servo arm. The cyberchute servo arm
extenders are too short so I made my own. They are made from some
clips I found in the tackle section of a cheap shop (crazy
clarke), some antenna tubes and golden cable. Golden cable is
brass plated steel wire. The cable is passed through the tube –
the ends looped back and soldered. Two layers of heat-shrink
stiffen the clip attachment.
The radio receiver (RX) is a six
channel JR. The width of the RX sets the internal fin width which
is just under 15mm. The hole were the RX sits now is large enough
for the ESC to be inserted there and manoeuvred into place. I am
not using a separate BEC this time.
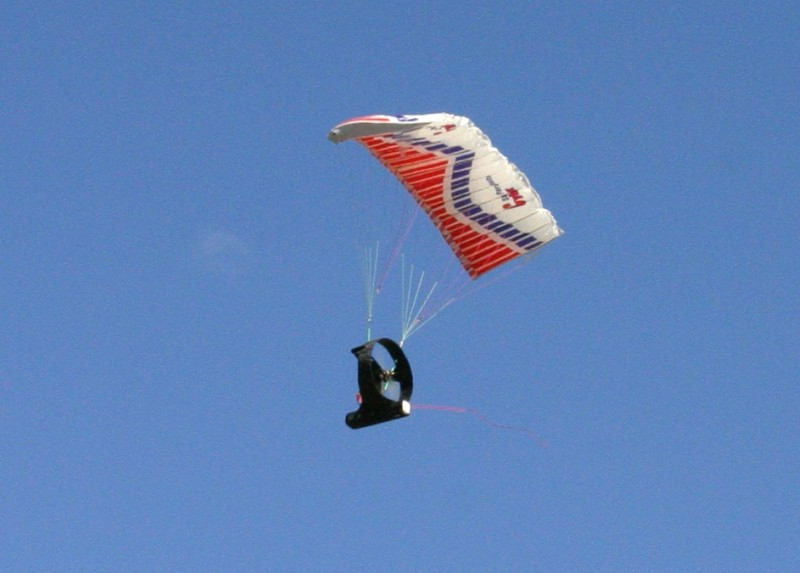
 Up
Up and away!
Up
Up and away!
I'd like to report it flew brilliantly but I
can't. It has the same problems as the rainbow. The offset motor
doesn't seem to help much. The prop is probably too close to the
canopy attachment points for it to have much effect. With the
plastic chute fitted - it took three or four launches to get it to
stay in the air without twisting up the bridle lines and crashing.
Once I got it up and cruising it wasn't too bad. The gondola
shimmied like both the rainbow and cyber-chute do. I'm pretty sure
this is gyroscopic precession problem. A lighter prop should help
reduce this.
I thought I was going to it crash into a tree but
I didn't. I pulled the power, did a U-turn, restored power at it
came back like it was on rails. I landed it at my feet.
 I'd
also like to report it successfully flew the rainbow kite but
again I can't. It did fly a little better than on “the black
rainbow” but ultimately the gondola would become unstable
the twist the lines.
I'd
also like to report it successfully flew the rainbow kite but
again I can't. It did fly a little better than on “the black
rainbow” but ultimately the gondola would become unstable
the twist the lines.
This aerobatic manoeuvre was unintended.
 I'm
pretty sure increasing the weigh would help but I'd like the solve
this while keeping the weight down and speed low.
I'm
pretty sure increasing the weigh would help but I'd like the solve
this while keeping the weight down and speed low.
Just adding the camera weigh may be
enough.
I'm also fairly sure these problems are worse for
small, light, high power models with pusher props. These issues
don't need to be eliminated – they just need to be reduced
to the point where the launch and flight are stable.
 The
propeller causes several problems. It causes a roll in the
opposite direction to the direction in which the prop rotates. It
also has gyroscopic effects so when the model wants the pitch nose
up the forces cause a sideways twist (ie yaw). The same it true
when turning – the nose will want to pitch up or down
depending on the direction of the turn.
The
propeller causes several problems. It causes a roll in the
opposite direction to the direction in which the prop rotates. It
also has gyroscopic effects so when the model wants the pitch nose
up the forces cause a sideways twist (ie yaw). The same it true
when turning – the nose will want to pitch up or down
depending on the direction of the turn.
One obvious answer
is the use co-axial props. Unlike co-axial helicopters where both
props are driven from below and concentric shafts are needed –
a paraplane can use two independently mounted and driven props.
This would be relatively easy to do.
I'm not ready to build another one but unless I can get this one working easily a co-axial design might be appear here one day.
I'm experimenting with fixed rudder like fins stay tuned.
Thanks go to Len Martin for taking the action photos for me.
Cheers Eddie.M.